Interpolating Heights
While you can now walk over your terrain, you probably notice that the camera seems really jittery. Why isn’t it smooth?
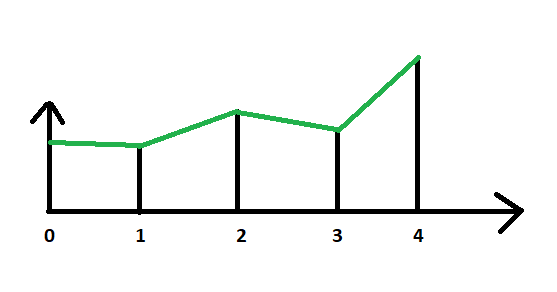
Think about how we render our terrain. The diagram below shows the terrain in one dimension. At each integral step, we have a height value. The terrain (represented by green lines) is interpolated between these heights.
Now think about what our function transforming world coordinates to heights is doing. It casts tx to an int to throw away the fractional part of the coordinate in order to get an array index. Thus, it is a step-like function, as indicated by the red lines in the diagram below:
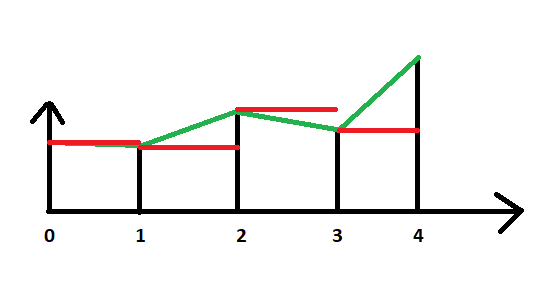
No wonder our movement is jerky!
Instead, we need to interpolate the height between the two coordinates, so we match up with the visual representation.
Linear Interpolation
We could use a method like MathHelper.Lerp to interpolate between two height values:
    var height1 = height[(int)x]
    var height2 = height[(int)x + 1]
    var fraction = x - (int)x;
    MathHelper.Lerp(fraction, height1, height2);
What does linear interpolation actually do? Mathematically it’s quite simple:
- Start with the first value at point A (
height1) - Calculate the difference between the value at point A and point B (
height2 - height1) - Calculate the fraction of the distance between point A and B that our point of interest lies (
x - floor(x)) - Multiply the difference by the fraction, and add it to the height at point A.
If we were to write our own linear interpolation implemenation, it might look like:
public float Lerp(float fraction, float value1, float value2)
{
    return value1 + fraction * (value2 - value1);
}
However, we aren’t working with just one dimension, we need to consider two. In other words, we need to use bilinear interpolation. But XNA does not define a method for this, so we’ll have to do it ourselves.
Implementing Bilinear Interpolation
Bilinear interpolation is the extension of linear interpolation into two dimensions. Instead of interpolating a point on a line (as is the case with linear interpolation), in bilinear interpolation we are interpolating a point on a plane. But with our terrain, we have two planes per grid cell:

In this diagram, n and m are coordinates in our heights array, corresponding to the vertex making up the grid cell. So if our (x, y) point is in this grid cell, n < x < n+1 and m < y < m+1.
Remember, a triangle defines a plane, and we used two triangles to define each grid cell in our terrain. So we need to know which triangle our point falls on.
This is why we wanted our diagonals to both face the same way, and also why we wanted them facing the way they do. If the fractional distance along either the x or y axis is greater than halfway (0.5 in our model coordinates), then we are on the upper-right triangle. The inverse is also true; if both coordinates are less than halfway, we’re in the lower left triangle. Any coordinate falling on line between the two triangles is shared by both.
Let’s return to our Terrain.GetHeightAt() method, and start refactoring it. First, we’ll want to change our out-of-bounds test to be slightly more exclusive, as we’ll be getting both the height values at both the lower-left corner (tx, ty) and the upper-right corner (tx + 1, ty + 1):
if (tx < 0 || ty < 0 || tx > width - 2 || ty > height - 2) return 0;We can then delete the line return heights[(int)tx, (int)ty];, and replace it with our test to determine which triangle we are in:
    // Determine which triangle our coordinate is in
    if(tx - (int)tx < 0.5 && ty - (int)ty < 0.5)
    {
        // In the lower-left triangle
    }
    else
    {
        // In the upper-right triangle
    }
Let’s finish the lower-left triangle case first. We’ll start with the height at (tx, ty), and add the amount of change along the x-axis as we approach (tx + 1, ty), and the amount of change along the y-axis as we approach (tx, ty + 1).
        // In the lower-left triangle
        float xFraction = tx - (int)tx;
        float yFraction = ty - (int)ty;
        float xDifference = heights[(int)tx + 1, (int)ty] - heights[(int)tx, (int)ty];
        float yDifference = heights[(int)tx, (int)ty + 1] - heights[(int)tx, (int)ty];
        return heights[(int)tx, (int)ty]
            + xFraction * xDifference
            + yFraction * yDifference;
The upper-right triangle is similar, only we’ll start with the height at (tx + 1, ty + 1) and subtract the amount of change along the x-axis as we approach (tx, ty + 1), and the amount of change along the y-axis as we approach (tx + 1, ty).
        // In the upper-right triangle
        float xFraction = (int)tx + 1 - tx;
        float yFraction = (int)ty + 1 - ty;
        float xDifference = heights[(int)tx + 1, (int)ty + 1] - heights[(int)tx, (int)ty + 1];
        float yDifference = heights[(int)tx + 1, (int)ty + 1] - heights[(int)tx + 1, (int)ty];
        return heights[(int)tx + 1, (int)ty + 1]
            - xFraction * xDifference
            - yFraction * yDifference;
Now if you run your code, your camera should smoothly glide over the terrain!
This GetHeightAt() method can be used for other purposes as well. For example, we could scatter instances of the crates we developed previously across the terrain, using it to determine what their Y-position should be.