Pseudocode Procedures
Resources
As our programs get larger and larger, we’ll probably find that we keep repeating pieces of code over and over again in our programs. In fact, we’ve probably already done that a few times just working through this lab. What if we had some way to build a small block of code once, and then reuse it over and over again in our programs?
Thankfully, this is a core feature of most programming languages! In our pseudocode, we call these procedures, though many other programming languages refer to them as functions, methods, or subroutines. For now, we’ll use procedure in pseudocode, and later on we’ll introduce the same concept in Python using a different term.
Creating a Procedure
Creating a procedure requires a more complex structure in our code than we’ve seen previously. The best way to learn it is to just see it in action, so here is the basic structure of a procedure in pseudocode:
PROCEDURE procedure_name()
{
    <block of statements>
}
Let’s look at each part of this structure in detail to see how it works:
- Every procedure starts with the special keyword
PROCEDURE. Just likeDISPLAY, thePROCEDUREkeyword is a built-in part of our language that we use to create a new procedure. - Following the keyword
PROCEDUREwe see the name of the procedure. In this case, we are usingprocedure_nameas the name of the procedure. Procedure names follow the same rules and conventions as variable names that we discussed earlier. The two most important rules are:- A procedure name must begin with a letter.
- Procedure names must only include letters, numbers, and underscores. No other symbols, including spaces, are allowed.
- Next, we have a set of parentheses
(). These are used for the parameters of a procedure, which we’ll learn about on the next page. - Following the parentheses, we see an opening curly brace
{on the next line, and a closing curly brace}a few lines later. The curly braces are used to define the block of statements that make up the procedure. - Inside of the curly braces, we see a
<block of statements>section. This is where we can place the code that will be run each time we run this procedure. Each procedure will include at least one statement here, but many times there are several.
It may seem a bit complex at first, but creating a procedure is really simple. For example, let’s see if we can create a procedure that performs the “Hello World” action we learned about earlier. We’ll start by writing the keyword PROCEDURE followed by the name hello_world, some parentheses, and a set of curly braces:
PROCEDURE hello_world()
{

}
That’s the basic structure for our procedure! Now, inside of the curly braces, we can place any code that we want to run when we use this procedure. To make it easier to read, we will indent the code inside of the curly braces. That makes it clear that these statements are part of the procedure, and not something else. So, let’s just have this procedure display "Hello World" to the user:
PROCEDURE hello_world()
{
    DISPLAY("Hello World")
}
There we go! That’s what a basic procedure looks like.
Calling a Procedure
Of course, learning how to write a procedure is only part of the process. Simply creating a procedure doesn’t actually cause it to run. So, once we have a procedure created, we have to learn how to use it in our code as well.
When we want to run a procedure, we call it from our code using its name. It may seem strange at first, but the term call is what we use to describe the process of running a procedure in our code.
Thankfully, a procedure call is very simple - all we have to do is state the name of the procedure, followed by a set of parentheses:
hello_world()So, our complete program would include both the definition of our procedure, and then a procedure call that executes it. Typically, we include the procedure calls at the bottom of the program, so it would look like this:
PROCEDURE hello_world()
{
    DISPLAY("Hello World")
}

hello_world()
Pretty simple, right? To make our code easy to read, we usually leave a blank line after the creation of a procedure, as shown in this example.
When our “mental model” of a computer runs this code, it will start at the top. Here, it sees that we are creating a procedure called hello_world, so it will make a note of that. It won’t run the code inside the procedure just yet, but it will remember where that procedure is in our code so it can find it later. It will then jump ahead to the end of the procedure, marked by the closing curly brace }. As it moves on from there, it will see the line that is a procedure call. Since it knows about the hello_world procedure, it can then jump to that place in the code and run that procedure before jumping back down here to run the next line of code. However, it can be a bit tricky to follow exactly what is going on, so let’s go through a code tracing exercise to make sure our “mental model” of a computer can properly follow procedure calls in our programs.
Code Tracing a Procedure Call
Let’s consider the following program, which contains two procedures, and a bit of code to call those procedures:
PROCEDURE foo()
{
DISPLAY("Run ")
}
PROCEDURE bar()
{
DISPLAY("Forrest, ")
}
foo()
bar()
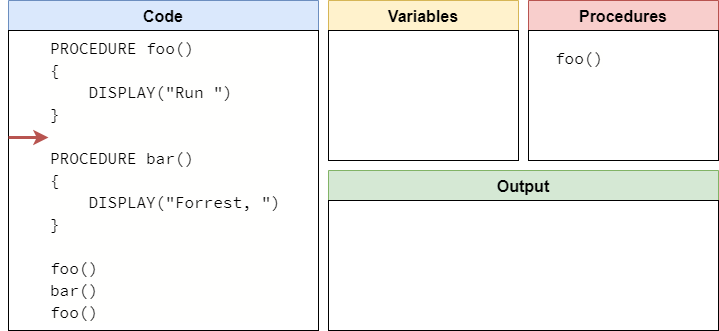
foo()As before, we can set up our code tracing structure that includes our code, variables, and output. However, this time we’re also going to add a new box to keep track of the procedures in our program. So, our code tracing structure might look something like this:

Once again, we can work through this program line by line, starting at the top. In this program, the very first thing we find is the creation of a new procedure. At this point, we aren’t running the code inside the procedure, we are simply creating it. So, our program will record that it now knows about the procedure named foo in its list of procedures, and it will skip down to the next line of code after the procedure is created.
This line is just a blank line, so our “mental model” of a computer will just skip it and move to the next line. Blank lines are simply ignored by the computer, but it makes it easier for us to write code that is readable. So, on the next line, we see the creation of another procedure:
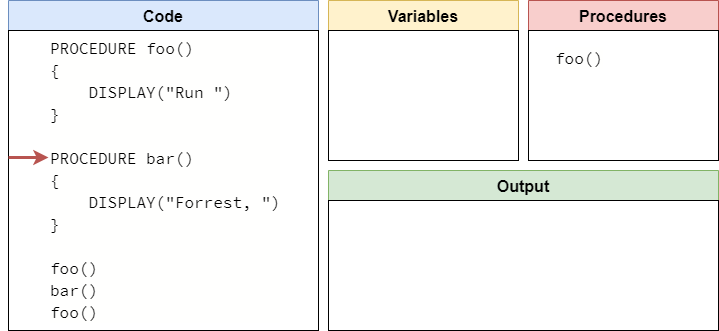
Once again, we see that a new procedure is being created, so our computer will simply make a note of it and move on. It will skip the blank line below the procedure, and eventually it will reach the first procedure call, as shown below:
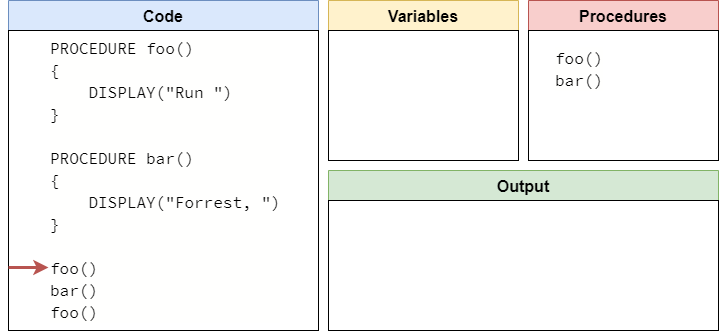
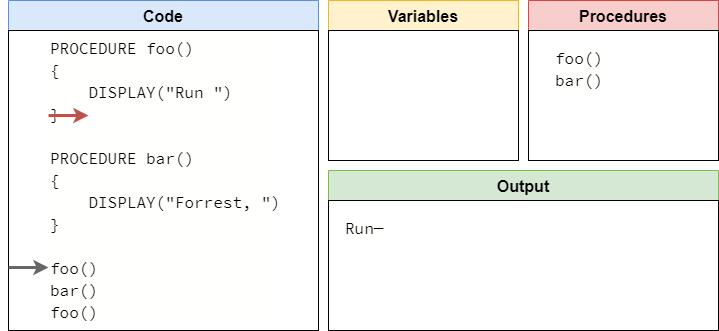
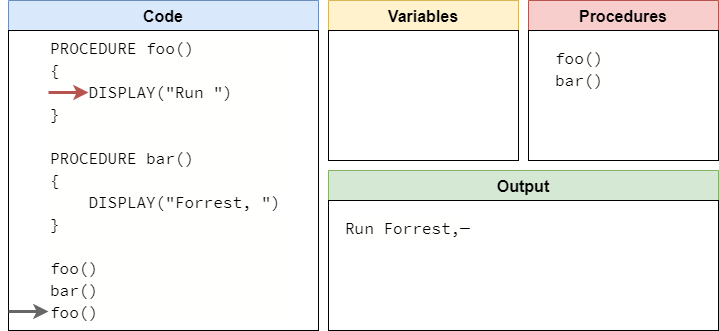
Ok, here’s where things get a bit tricky! At this point, we are calling the procedure named foo. So, our computer will check the list of procedures it knows about, and it will see that it knows where foo() is located. So, our “mental model” of a computer knows that it can execute that procedure. To do that, it will jump up to the first statement inside of the procedure and start there. At the same time, it will also keep track of where it was in the program, so it can jump back there once the procedure is done. We’ll represent that with a shaded arrow for now:
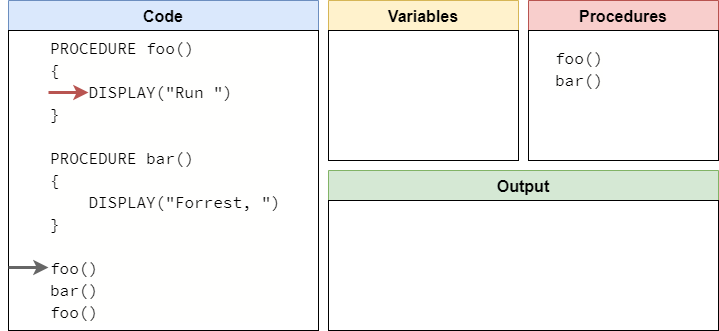
Now we are looking at the first line of the foo procedure, which simply displays the text "Run " on the output. So, we’ll update our output, and move to the next line of the procedure.
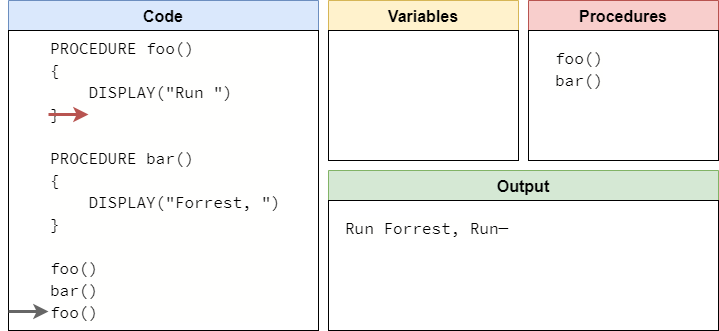
At this point, we’ve reached the end of our procedure. So, our computer will then jump back to the previous location, indicated by the shaded arrow.

Since there is nothing else to execute on this line, it will simply move to the next line.
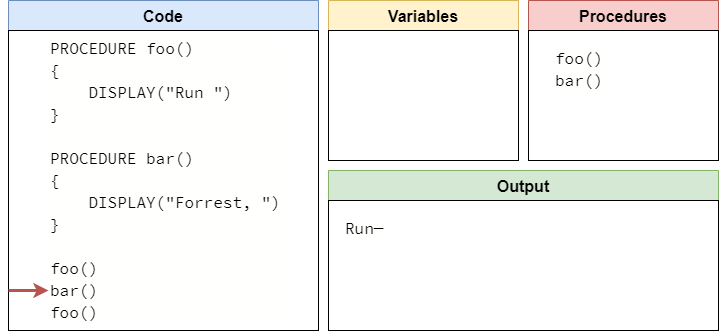
Once again, we see that this is another procedure call. So, the computer will make sure it knows where the bar() procedure is, and then it will jump to the first line of that procedure. When it does, it will remember what line of code it was currently running, so it can jump back at the end of the procedure.
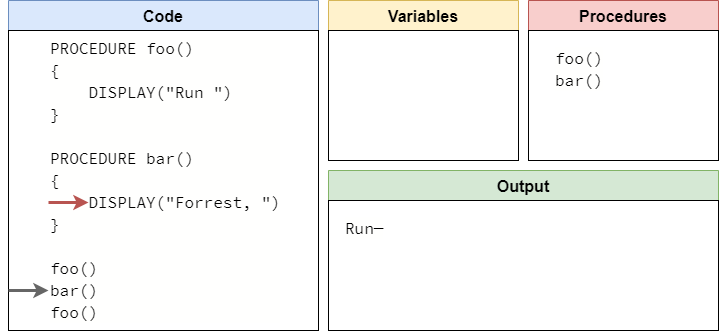
Like before, it will then run the first line of the bar() procedure, which will display "Forrest, " to the user. So, we’ll update our output section, and move the arrow to the next line.
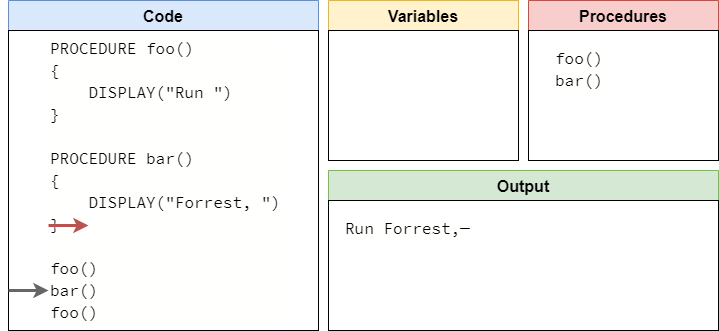
We’re back at the end of a procedure, so we will jump back to the previous location and see if there is anything else to do on that line:

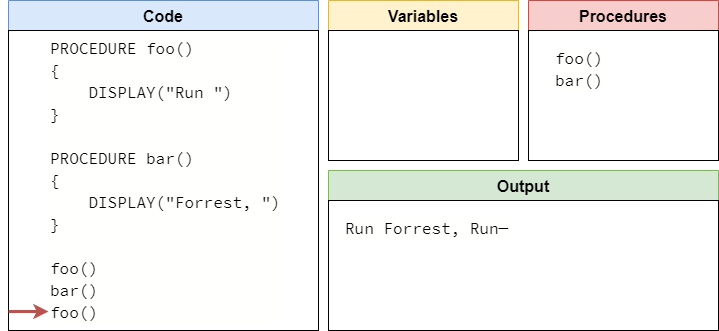
Since there’s nothing else there, our “mental model” will just move to the next line of code:

By now, we should have a good idea of what is happening when we call a procedure. We simply jump to where it starts, making sure we remember where we came from:
Then, we execute the lines of code in the procedure:
Finally, when we reach the end of the procedure, we go back to where we came from and see if there is anything else to do on that line:
There’s nothing left to do, so we’ve reached the end of our program! The full process is shown in the animation below:
It is very important for us to make sure our “mental model” of a computer knows how to properly call and execute procedures, since that is a core part of developing larger and more complex programs. Thankfully, we’ll get lots of practice at this as we learn to program!
One of the tricky parts of learning how to program is knowing when to take a piece of code and make it into a procedure. A great principle to keep in mind is the Don’t Repeat Yourself or “DRY” principle of software development. In this principle, if we find that our program contains the same lines of code in multiple places, we should make a procedure containing those lines of code and call that procedure each time we use those lines in our program. In that way, we are only writing that block of code once, and we can use it anywhere.
Another principle is that programs should only consist of procedures, and each procedure should only be a few lines of code. By following this method of development, each procedure only performs one or two actions, making it much easier to test and debug those procedures independently and make sure they are working properly before testing the entire program as a whole.
As we continue to learn more about programming, we’ll see both of these principles in action.