Functions
Resources
Python also supports the use of procedures, which allows us to write small pieces of code that can be repeatedly used throughout our programs. In Python, we call these procedures functions. We’ve already seen one example of a function in Python - the print statement is actually a function! Let’s look at how we can create and use functions in Python.
Creating a Function
The process of creating a function in Python is very similar to the way we created a procedure in pseudocode. A simple function in Python uses the following structure:
def function_name():
    <block of statements>
Let’s break this structure down to see how it works:
- First, a function definition in Python begins with the word
def, which is short for define. In effect, we are stating that we are defining a new function using the specialdefkeyword. - Next, we include the name of the function. Function names in Python follow the same rules as variable names:
- A function name must begin with a letter or underscore
_. Function names beginning with an underscore_have special meaning, so we won’t use those right now. - A function name may only include letters, numbers, and underscores
_. - After the function name, we see a set of parentheses
(). This is where we can add the parameters for the function, just like we did with procedures in pseudocode. We’ll see how to add function parameters later in this lab. - Then, we end the first line of a function definition in Python with a colon
:. This tells us that the block of statements below the function definition is what should be executed when we run the function. In pseudocode, we used curly braces{}here. - Finally, we have the block of statements that are part of the function itself. This block of statements must be indented one level to indicate that it is part of the function and not something else. When we reach the end of the function, we cease to indent the code, which tells Python that we’ve ended the function and are starting something else. So, notice that there is no closing curly brace
}or any other marker to indicate the end of the function - only the indentation tells us where the function’s code ends.
Indentation in Python
So, let’s discuss indentation in Python, since it is very important and is usually something that trips up new Python developers. Most programming languages use symbols such as curly braces {} to surround blocks of statements in code, making it easy to tell where one block ends and another begins. Similarly, those languages also use symbols such as semicolons ; at the end of each line of code, indicating the end of a particular statement.
These programming languages use those symbols to make it clear to both the developer and the computer where a particular line or block of code begins and ends, and it makes it very easy for tools to understand and run the code. As an interesting side effect, it also means that the code doesn’t need to follow any particular structure beyond the use of those symbols - many of the languages allow developers to place multiple statements, or even entire programs, on a single line of code. Likewise, indentation is completely optional, and only done to help make the code more readable.
Python takes a different approach. Instead of using symbols like semicolons ; and curly braces {} to show the structure of the code, Python uses newlines and indentation for this purpose. By doing so, Python is simultaneously simpler (since it has fewer symbols to learn) and more complex (the indentation has meaning) than other languages. It’s really a tradeoff, though most Python programmers will admit that not having to deal with special symbols in Python is well worth the effort of making sure that the indentation is correct, especially since most other languages follow the same conventions anyway, even if it isn’t strictly required.
So, how can we indent code in Python? Typically, we use four consecutive spaces for each level of indentation. So, below the function definition def function_name(): shown above, we would place four spaces before the first line of the <block of statements>, and then continue to do so for each line below that should be included in the function.
Thankfully, most text editors used for programming, such as Codio, Atom, Visual Studio Code, and more, are all configured to convert tabs to spaces. So, we can simply press the Tab key on the keyboard to insert the correct amount of spaces for one level of indentation. Likewise, we can usually use Shift+Tab to remove four spaces.
Finally, it is worth noting that there is a special symbol that actually is a tab in text, which is represented as \t in a string. Like the newline symbol, we can’t see it in our UI in most cases, but it is there. Some non-programming text editors, such as Notepad in Windows, will insert that symbol instead of four spaces when we press the Tab key. If we try to run a program that contains those symbols, the Python interpreter may not be able to read our program and will give us an error about inconsistent use of tabs and spaces. If that happens, we’ll need to make sure our program is consistently using only tabs or spaces for indentation. Most editors used for programming have a special function for converting tabs to spaces, and there are lots of online tools available for this as well.
Function Example
Let’s look at an actual function in Python. In this case, we’ll create the simple hello_world function again in Python:
def hello_world():
    print("Hello World")
Really, this structure is exactly like we’d expect it to be, based on the pseudocode we learned about earlier. We start with the def keyword, then the name of the function. After that, we have parentheses () where the parameters would go, and then a colon : to show the start of the block of statements. Inside of the function, we indent the block of statements that make up the code to be run when this function is run - in this case we just print the string "Hello World" to the terminal. That’s really all there is to it!
Calling a Function
Likewise, calling a function in Python is exactly the same as what we saw in pseudocode - we simply state the name of the function, followed by a set of parentheses where we would place the arguments if the function required any parameters:
hello_world()So, a complete Python program that includes the hello_world function and calls that function would look like this:
def hello_world():
    print("Hello World")


hello_world()
Try placing this code in a Python file and see if you can run it. It should work!
Notice that the function call for hello_world is not indented, and we included a couple of blank lines after the end of the definition of that function before the next piece of code. We do this for two reasons:
- We do not indent code that is not part of the block of statements within a function. Since the function call for
hello_worldshould not be part of the definition for the function, we don’t want to indent it. - In Python, the convention is to include two blank lines at the end of a function definition. So, that is why we included two blank lines in the code. These blank lines are not required, but it is good practice to include them.
Code Tracing a Function Call
Finally, let’s briefly go through an example of tracing a program that includes a couple of functions and function calls. Here’s a quick example we can use:
def foo():
    print("eye")


def bar():
    print("to")


foo()
bar()
foo()
To trace this example, copy-paste the code into the tutor.py file in the python folder in Codio, or by clicking this Python Tutor
link.
When the program first loads, we should see this setup:
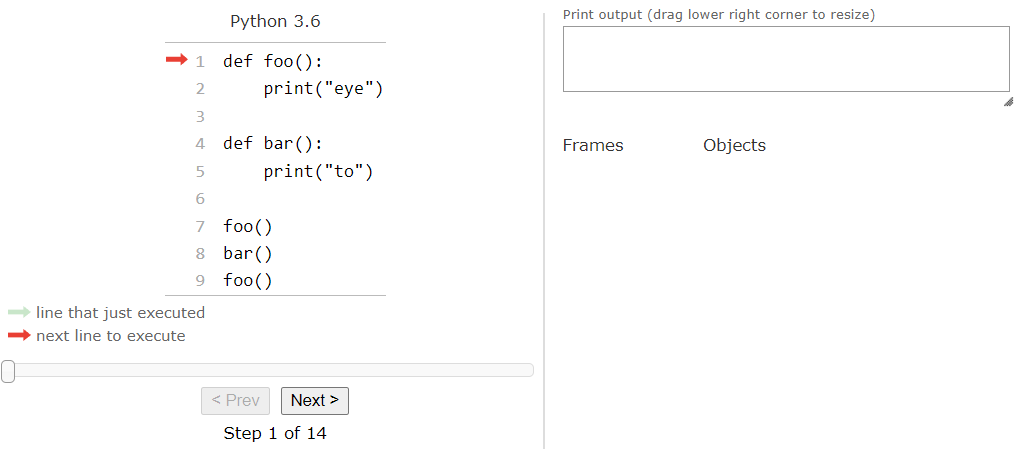
Again, this is very familiar to us based on what we’ve seen so far. So, let’s click the Next > button to step through the first part of the code:
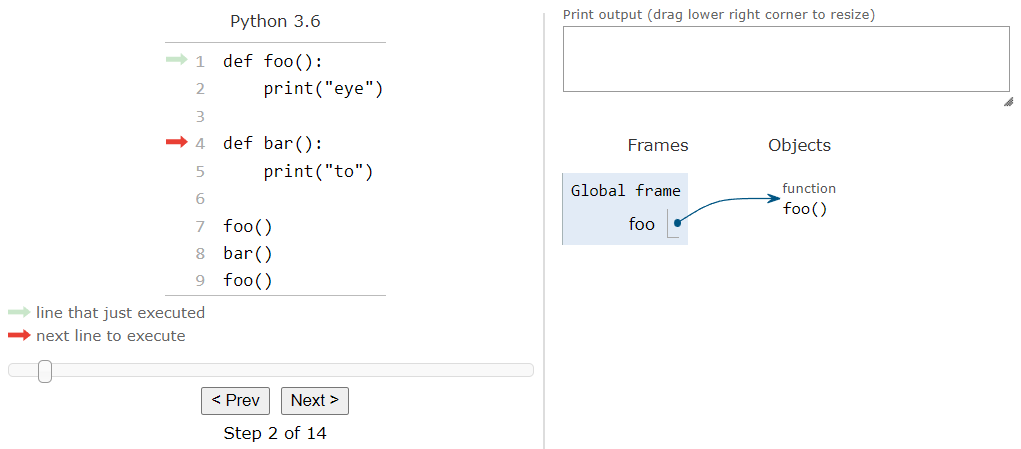
As we can see, the first thing that Python sees is the definition for the foo function. Instead of keeping a separate list of functions, Python Tutor simply adds that function to the global frame just like any variable. The function itself is added to the Objects list, and then there is an arrow, connecting the variable in the global frame to the function in the objects list. In fact, this is exactly how Python handles functions - they are just treated like variables that are pointers to the function objects themselves! So, when we click Next > again, we’ll see it do the same to the bar function as well:
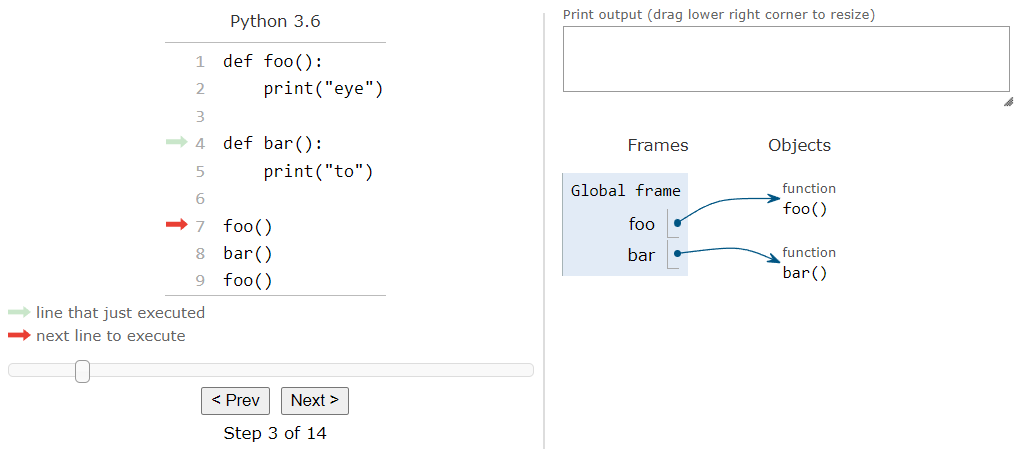
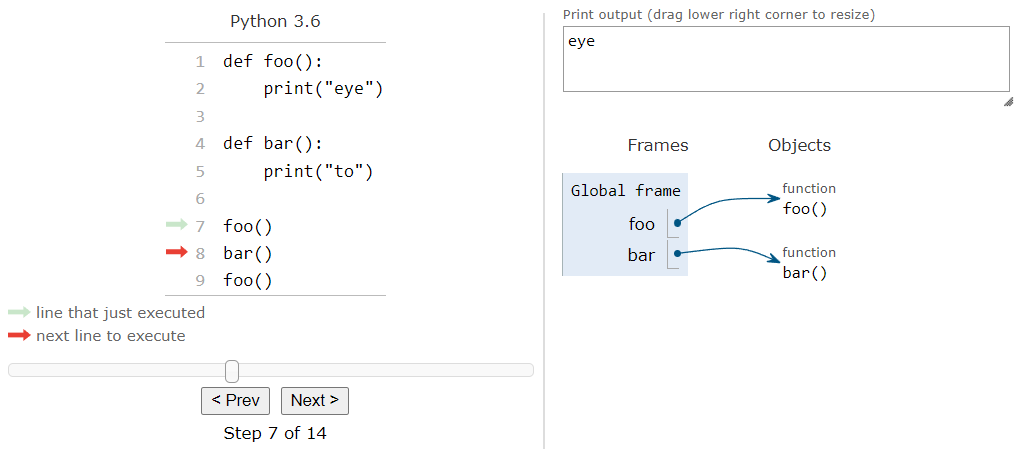
At this point, we are ready to execute the first function call, which will run the foo function. So, when we click the Next > button, we’ll see the arrow jump to the start of that function:

Here, we see Python tutor do something a bit different than in our own code traces - instead of keeping all of the variables in a single box, it creates a new frame to keep track of the variables that are created in the foo function. When we look an example of a function with parameters, we’ll see where this becomes very useful. For now, we can just ignore it and move on by clicking Next > once again:

At this point, the function is ready to print the string value "eye" to the terminal. So, if we click Next > once again, we should see that reflected in the output of Python Tutor:
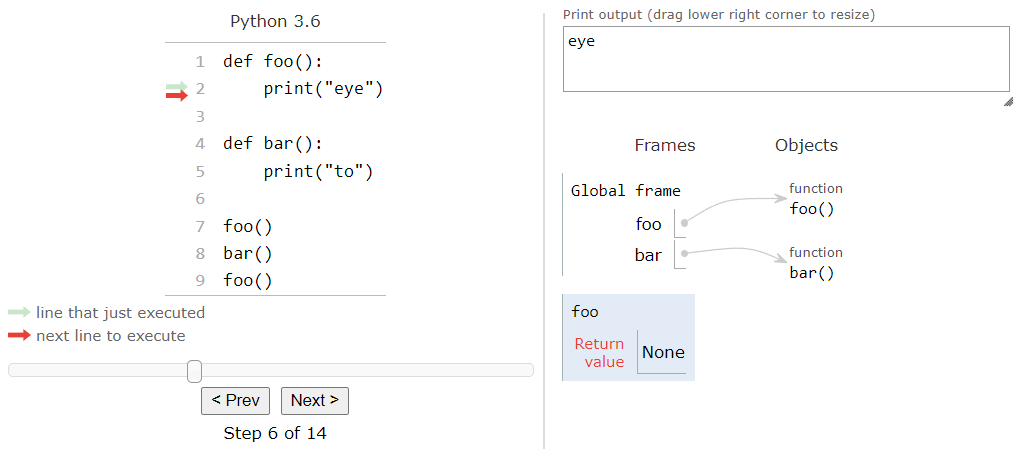
At this point, we’ve reached the end of the foo function. So, Python Tutor will remove the foo frame from the list of frames and it will jump back down to where the function was called from when we click Next >:
Here, we are back to the main piece of our code, and we’re ready to call the bar function. So, we can click Next > once again:
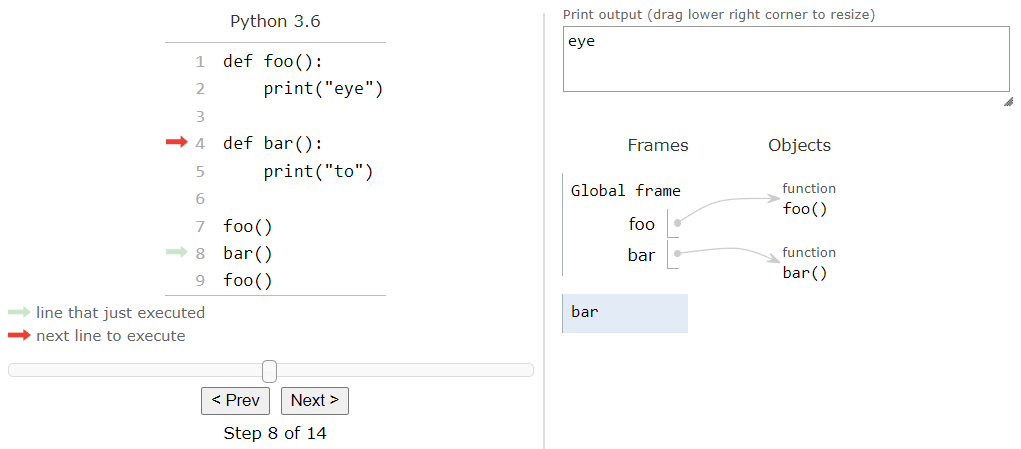
This will jump up to the start of the bar function and create a new frame for storing any variables created by bar. We can click Next > again to enter the function:
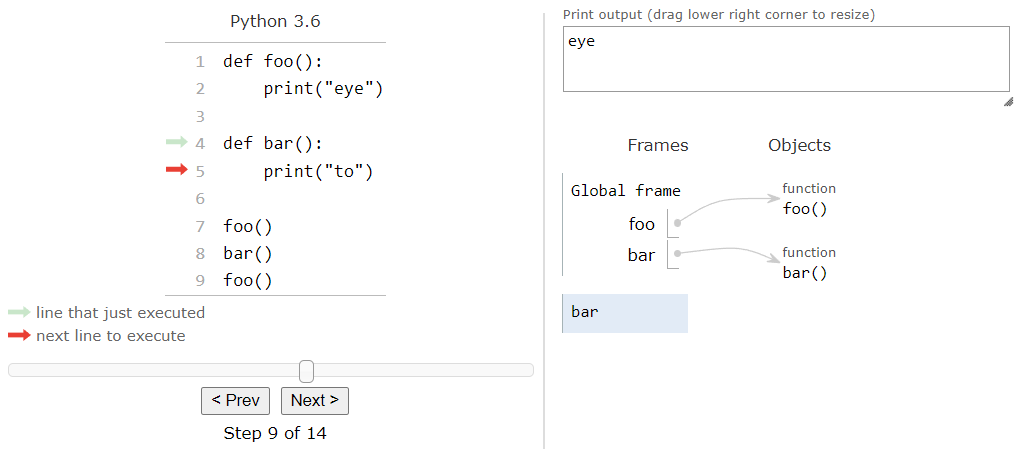
And then click Next > again to print the string value "to" to the output:
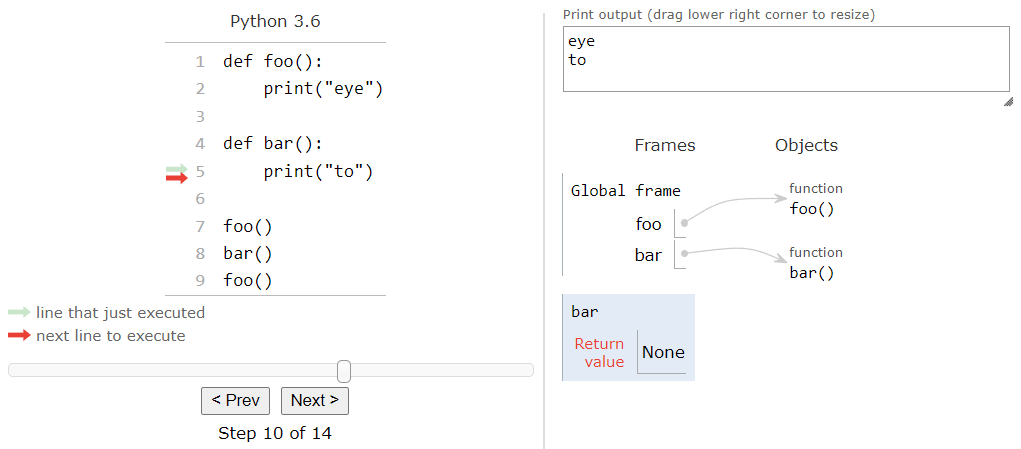
Once again, we are at the end of a function, so when we click Next > once more:
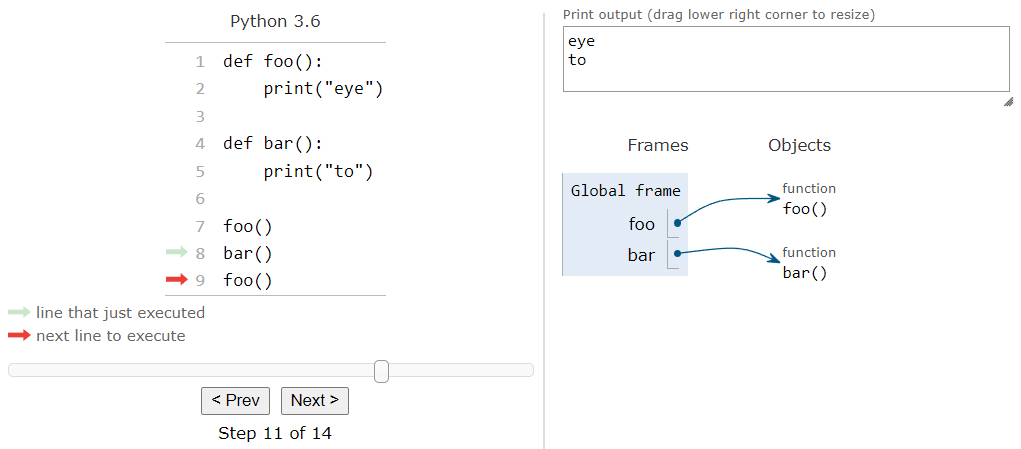
We’ll move back to the main piece of the code, removing the frame for bar. On this line, we see yet another function call, this time to the foo function. Hopefully by this point we can predict what is going to happen, so we can click Next > a few more times to jump to the foo function and execute it. When it is done, we’ll see this output:

There we go! We’ve successfully traced the execution of a Python program that contains multiple function calls. The full process is shown in this animation:

Using tools like Python Tutor to trace through code is a great way to make sure we understand exactly what our computer is doing when it is running our code.