Pseudocode Input
Resources
So far, we’ve mainly focused on writing programs that can store and manipulate data, but the data itself has always been included in the code itself. While that approach is great for learning the basics, real programs often need to receive data as input from the user. This allows programs to truly be interactive and perform work based on what the user needs. So, let’s introduce a new expression in pseudocode that allows our programs to receive input from the user.
Input Expression
We can use the INPUT() expression in pseudocode to get input from the user. It works just like a procedure, similar to DISPLAY(), but it doesn’t require any parameters. Instead, when evaluated the INPUT() expression will simply result in whatever input value is provided from the user. So, we can use this in an assignment statement to store that value in a variable.
The INPUT() expression can be a bit confusing to work with in pseudocode, since we can only run these programs on our “mental model” of a computer. There isn’t any user interface, and we are acting both as the computer and as the user in most cases. However, this allows us to build and reason about programs that require input from the user, which is a useful skill to develop. As we continue to learn more about a real programming language, we’ll see that this same skill applies there as well.
Let’s look at a quick example of using the INPUT() expression in pseudocode:
DISPLAY("Enter your name: ")
name <- INPUT()
DISPLAY("Hello ")
DISPLAY(name)
As we work through this program, we see the second line requires input from the user. So, it is not longer enough to simply read the code and process what it does - we must also consider what the user inputs as well. For this example, let’s assume the user inputs Willie Wildcat when prompted. In that case, the output should look like this:
Enter your name: Willie Wildcat
Hello Willie Wildcat
In this example, we store the user’s input in a variable named name, and then we print the value of the name variable using a DISPLAY() statement. By default, the INPUT() expression will result in a string value, so it can accept just about any text that the user could provide.
Numerical Input
What if we want the user to input a number instead? Traditionally, the AP CSP Pseudocode
would just handle this automatically by converting the data to whatever type is needed or makes the most sense. In this course, however, we’re going to explicitly convert data between types. So, we can use the NUMBER() procedure to make that conversion.
Let’s look at an example:
DISPLAY("Enter a number: ")
text <- INPUT()
number <- NUMBER(text)
square <- number * number
DISPLAY("The square of your input is ")
DISPLAY(square)
Let’s quickly trace this program to understand how it works! We’ll set up our code trace like always, as shown below:

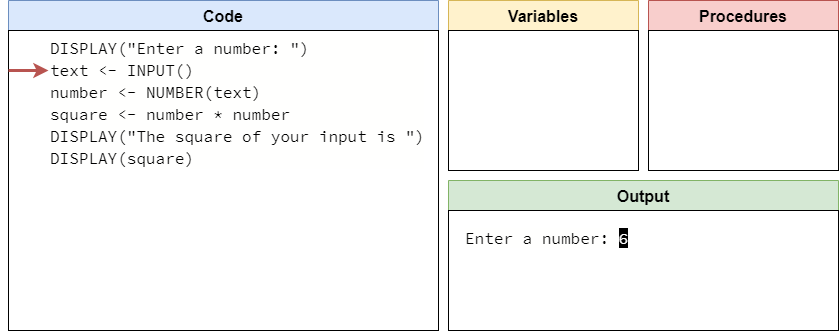
The first line will simply print a prompt to the user for input, so we’ll add that to the output section and move to the next line:

Here, we are asking the user for input. On a real computer, the program would pause with a blinking cursor, allowing the user to enter input. In our code trace, we’ll show the user’s input as white text against a black background. So, if the user enters the text 6, it would look like this in our code trace:
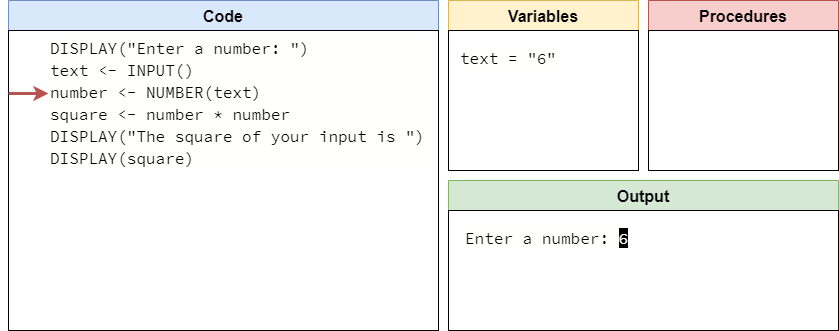
The INPUT() expression will give us that value, which we can store in the text variable as shown in this step:
The next line will use the NUMBER() procedure to convert the text value "6" to the numerical value $6$ and store that in the new number variable:
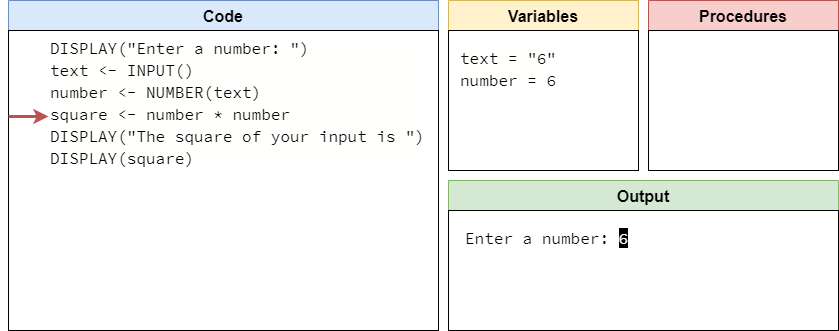
Notice that the value $6$ in the number variable does not have quotes around it. In our code traces, just like anywhere else, we’ll be careful to make sure that string values are surrounded by quotation marks, and numerical values are not.
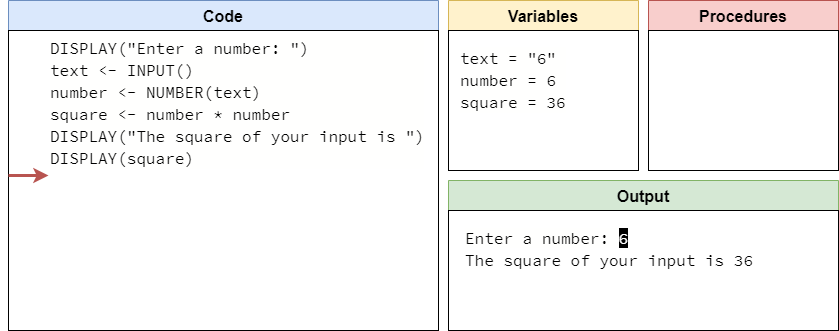
On the next line, we’ll compute the square of the input by multiplying it by itself, and storing that result in the square variable:

Finally, the last two lines of the program will display output to the user, including the new square value. We’ll start this output on the next line, since user input usually ends with the user pressing the ENTER key to denote the end of the input, which results in a newline character that is part of what is shown on the screen:
The full process can be seen in this animation:
This example shows us quite a bit about how we can use the INPUT() expression in our pseudocode to build programs that are interactive and allow the user to input data for our programs to store and manipulate.