Milestone 6 Requirements (Fall 2022)
This textbook was authored for the CIS 400 - Object-Oriented Design, Implementation, and Testing course at Kansas State University. This section describes assignments specific to the Fall 2022 offering of that course.
General requirements:
-
You will need to follow the style laid out in the C# Coding Conventions
-
You will need to comment your code using XML comments
-
You will need to update your UML to reflect your current code
-
You will need to update your tests to reflect changes to your Data project
Assignment requirements:
-
Implement the
INotifyPropertyChangedinterface on all menu items -
Write tests for all additions to the
Dataproject -
Update your UML Class Diagrams for:
- Data Library
- Point of Sale
(You don’t need to create a UML of your test project, though you can if you like)
Purpose:
This assignment is intended to familiarize you with the concept of data binding, especially:
- How it depends on
PropertyChangedevents to work. - How data binding is expressed in XAML (the Binding syntax)
- How the
DataContextproperty in WPF controls can be used to share a bound object
Additionally, this assignment should give you plenty of practice making WPF controls functional. This is also where your projects will really start to diverge from each other depending on the implementation route you choose to follow.
Assignment Details
Implementing INotifyPropertyChanged
Most of this assignment is centered around the implementation of the INotifyPropertyChanged interface. This needs to be implemented on every menu item (Note that this can be done through inheritance, so you only have to implement it in a common base class - though see the warning below for a common gotcha). Implementing the interface requires you to declare an event of type PropertyChangedEventHandler named PropertyChanged. Doing this much satisfies the letter of the INotifyPropertyChanged interface, but not the intent.
To satisfy the intent, you should also invoke any event listeners registered with your PropertyChanged event handler when one of the properties of the object changes, with the details about that change. You must do this for ALL properties that can change in your menu item classes (Hint: you can skip properties like the PrehistoricPBJ.Price, which cannot change).
Think carefully about the requirement of invoking PropertyChanged when and where the property changes. Consider the Price property of a Triceritots. Where does it change? It (depending on your implementation) has no setter! Remember, it is a calculated value, and its value is dependent on the Size property. So when the Size property changes, so does the Price property! You must account for all the possible places in your class’ code that trigger a property might change when you implement INotifyPropertyChanged.
An odd side effect of the nature of the .NET platform is that events cannot be invoked from a different class than they are defined in. This includes inherited events. The standard practice to get around this issue is to declare a protected helper method to do the invocation in a base class that also implements the event, i.e.:
protected virtual void OnPropertyChanged(string propertyName)
{
    this.PropertyChanged?.Invoke(this, new PropertyChangedEventArgs(propertyName));
}
This method can then be called in derived classes to indicate a property is changing.
Testing your INotifyPropertyChanged Implementation
To verify that you have correctly implemented these properties, you need to write additional tests to check that the property does, indeed change. The PropertyChange Assertion we discussed in the testing chapter is used for this purpose. These tests should be placed in the unit test class corresponding to the menu item being tested.
Here is an example using the Triceritots:
[Theory]
[InlineData(ServingSize.Small, "Size")]
[InlineData(ServingSize.Medium, "Size")]
[InlineData(ServingSize.Large, "Size")]
[InlineData(ServingSize.Small, "Price")]
[InlineData(ServingSize.Medium, "Price")]
[InlineData(ServingSize.Large, "Price")]
[InlineData(ServingSize.Small, "Calories")]
[InlineData(ServingSize.Medium, "Calories")]
[InlineData(ServingSize.Large, "Calories")]
public void ChangingSizeShouldNotifyOfPropertyChanges(ServingSize size, string propertyName)
{
  Triceritots tots = new Triceritots();
  Assert.PropertyChanged(tots, propertyName, ()=>{
    tots.Size = size;
  });
}
Remember that calculated properties will change based on the property they are calculated from, and you must also test for these. I.e. on the sides, you might have a test method PricePropertyChangedWhenSizeChanges(Size size). Alternatively, you could combine multiple property checks into one test, i.e. ShouldNotifyOfPropertyChangedWhenSizeChanges(Size size, string propertyName) (as in the example above) and supply the names of the separate properties through [InlineData].
Additionally, it is important to test that the menu item classes implements the INotifyPropertyChanged interface. This can be accomplished with the IsAssignableFrom<T>(object obj) Type Assertion, i.e.:
public void ShouldImplementINotifyChanged()
{
  Triceritots tots = new Triceritots();
  Assert.IsAssignableFrom<INotifyPropertyChanged>(tots);
}
You might be wondering why it is important to test for if the class actually implements INotifyPropertyChanged. Property binding only works if the class can be cast to be an instance of INotifyPropertyChanged, so even if you have correctly set up the PropertyChanged event, your GUI will not update unless you have explicitly implemented the interface.
Menu Item Selection Event Handler
You will also need to implement an event handler for when a button representing a menu item in your MenuItemSelectionControl is pressed. This event will need to:
- Construct an instance of the corresponding menu item (i.e. a
PrehistoricPBJif the button pressed was for a Prehistoric PBJ). - Display the corresponding customization screen (i.e. a screen for customizing the Prehistoric PBJ) within the
MainWindow, replacing or covering up theMenuItemSelectionControl - Assign the menu item instance to the
DataContextof the customization screen. By doing so, the item’s properties are bound to the GUI controls
If done correctly, changing properties in the customization control will change the bound menu item instance. Continuing our Prehistoric PBJ example, unchecking the Peanut Butter checkbox should change the displayed calories for the Prehistoric PBJ.
Since the event you are listening for happens in the MenuItemSelectionControl but the displaying must happen in the MainWindow, you must decide which of these two locations you want to host the event listener. If you choose the MainWindow you will be using a Routed Event, i.e. Button.Click. If you choose the MenuItemsSelectionControl you will need to climb the Elements tree to reach the MainWindow.
Binding Customization Controls
Once you know you have your menu item classes (your entrees, sides, drinks, and treats) ready, you can bind their properties to the controls you have created in your customization screens. Since you have set the screen’s DataContext to be a new instance of that item (in the previous requirement), these controls will now directly modify the bound menu item object.
With many controls, verifying your binding is working correctly may be difficult (as the control behaves the same either way). Using breakpoints, or supplying an initialized object with properties changed from their default to the binding are two ways of verifying. Alternatively, you can bind the same property to a display-only <TextBlock> in a summary section. This verification will become much easier when we add order tracking in the next milestone.
Updating your UML
Finally, update your UML to reflect the current state of your Data and PointOfSale projects.
The INotifyPropertyInterface can be added like so:
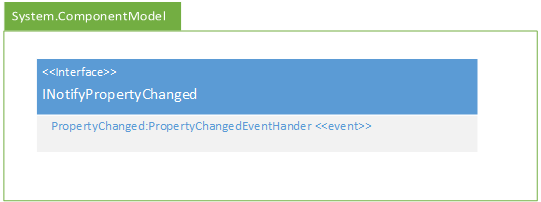
Because this is a realization relationship, you will also need to add the event to your class boxes. It should be placed in the second box (with your properties) and use the event stereotype, i.e.:
+PropertyChanged:PropertyChangedEventHandler <<event>>
Also, remember that any event listeners you have defined in your code behind in the PointOfSale project must be represented in your UML. Also, any properties you have given a x:Name attribute in your XAML, i.e.:
<MainWindow>
  <Border x:Name="SwitchBorder">
  </Border>
</MainWindow>
Are public properties and should therefore show up in your UML, i.e.:
+SwitchBorder:Border <<get, set>>
You do not need to show components defined in the XAML that do not have a x:Name property.
Note: You do not need to create a UML diagram of your DataTest project, though you can if you want.
Submitting the Assignment
Once your project is complete, merge your feature branch back into the main branch and create a release tagged v0.6.0 with name "Milestone 6". Copy the URL for the release page and submit it to the Canvas assignment.
Grading Rubric
The grading rubric for this assignment will be:
20% Structure Did you implement the structure as laid out in the specification? Are the correct names used for classes, enums, properties, methods, events, etc? Do classes inherit from expected base classes?
20% Documentation Does every class, method, property, and field use the correct XML-style documentation? Does every XML comment tag contain explanatory text?
20% Design Are you appropriately using C# to create reasonably efficient, secure, and usable software? Does your code contain bugs that will cause issues at runtime?
20% Functionality Does the program do what the assignment asks? Do properties return the expected values? Do methods perform the expected actions?
20% UML Diagrams Does your UML diagram reflect the code actually in your release? Are all classes, enums, etc. included? Are associations correctly identified?
Projects that do not compile will receive an automatic grade of 0.