Java Swing
Now let’s dive into Java Swing and see how to make our very first GUI application in Swing.
Imports
At the top of our applications, we’ll need to import elements from three different packages:
import java.awt.*;
import java.awt.event.*;
import javax.swing.*;
The java.awt package includes all of the classes related to the older Abstract Window Toolkit (AWT) in Java, and the java.swing package includes all newer Java Swing packages. Instead of reinventing the wheel, Java Swing reuses many components from AWT, such as the Dimension class that is used to control the size and position of windows. We also include the java.awt.event package to handle events such as button clicks.
Of course, when using these libraries in our project code, we’ll want to import each class individually in order to satisfy the requirements of the Google Style Guide (See 3.3.1 - No Wildcard Imports). That is left as an activity for later, but the example project in this chapter will show some of the imports required.
Main Window
One of the easiest ways to build a program using Java Swing is to simply inherit from the JFrame class. In that way, our program has access to all of the features of the topmost container in Java Swing, and we can use it just like any other component in the GUI.
Then, within the constructor of that class, we can set our layout manager and add elements to our application. Let’s look at the code of a simple application, and then we’ll go through it piece by piece.
import java.awt.*;
import java.awt.event.*;
import javax.swing.*;
public class MainWindow extends JFrame implements ActionListener {
/**
* Constructor to build the GUI and display elements
*/
public MainWindow() {
// sets the size of this window
this.setSize(new Dimension(200, 100));
// tell the program to exit when this window is closed
this.setDefaultCloseOperation(JFrame.EXIT_ON_CLOSE);
// set the layout manager
this.setLayout(new GridBagLayout());
// Create the constraints for the GridBagLayout manager
GridBagConstraints gbc = new GridBagConstraints();
// set the constraints for the label
gbc.fill = GridBagConstraints.HORIZONTAL;
gbc.gridx = 0;
gbc.gridy = 0;
// add a label
this.add(new JLabel("Hello World!"), gbc);
// reset the constraints for the button
gbc.gridx = 0;
gbc.gridy = 1;
// create a button
JButton button = new JButton("Close");
// set the button's command:
button.setActionCommand("close");
// send the clicked event to this object
button.addActionListener(this);
// add the button
this.add(button, gbc);
}
/**
* actionPerfomed is called when a user interacts with an element
* that lists this class as it's action listener
*
* @param e the event generated by the action
*/
@Override
public void actionPerformed(ActionEvent e) {
if ("close".equals(e.getActionCommand())) {
// close button was clicked, so exit the application
System.exit(0);
}
}
/**
* Main method to start this application
*/
public static void main(String[] args){
SwingUtilities.invokeLater(new Runnable() {
public void run() {
new MainWindow().setVisible(true);
}
});
}
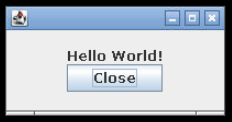
}When we compile and run this code, then open the Codio viewer, we should see this window:
Let’s go through this code and explore what it does. We’ll also cover most of this content in the example project for this chapter.
Inheritance
This application includes two instances of inheritance:
public class MainWindow extends JFrame implements ActionListener {- We extend the JFrame class, which acts as our program’s main window.
- We implement the ActionListener interface, which allows our window to listen and react to events generated by user interactions such as button clicks.
While we don’t need to use inheritance here, it is one of the simplest ways to build our GUI - we can then treat our MainWindow class just like any other JFrame elsewhere in the code. As we’ll see in the example project, this makes it easy for us to create custom controls or entire panels that we can reuse in our code.
Window Setup
Next, we have a few lines of code that help us set up the window for this application and configure the layout manager.
// sets the size of this window
this.setSize(new Dimension(200, 100));

// tell the program to exit when this window is closed
this.setDefaultCloseOperation(JFrame.EXIT_ON_CLOSE);

// set the layout manager
this.setLayout(new GridBagLayout());
// Create the constraints for the GridBagLayout manager
GridBagConstraints gbc = new GridBagConstraints();
First, we set the size of the window to 200 pixels by 100 pixels, using the Dimension class from AWT. Then, we configure the window to exit our application when the window itself is closed. If we don’t do this, then our Java application may continue to run in the background even if the window itself is closed.
Below that, we set our frame’s layout manager to the GridBagLayout layout manager. The Java GridBagLayout allows us to arrange elements in rows and columns, but gives us additional flexibility over the GridLayout manager. In many cases, we’ll want to use GridBagLayout if we are writing the code by hand, as it gives us a good balance between the power of the layout manager and the simplicity of the code. It also works similarly to the grid layout manager in Python tkinter, making it a helpful choice in this class.
Finally, we create an instance of GridBagConstraints, which is used to specify the constraints we wish to apply on an element when we add it to a container that is using the GridBagLayout. In our minimal example, we’ll use it to specify the row (gridx) and column (gridy) of the element, as well as the ability to resize the components horizontally (fill) if the window is stretched, but not vertically.
Adding a Label
Once we’ve set up our JFrame, we can add a few components. The first component is a JLabel.
// set the constraints for the label
gbc.fill = GridBagConstraints.HORIZONTAL;
gbc.gridx = 0;
gbc.gridy = 0;

// add a label
this.add(new JLabel("Hello World!"), gbc);
First, we start by setting the constraints in our instance of GridBagConstraints. The fill option as described above allows this component to stretch horizontally, and we are adding it to the 1st row gridx and first column gridy of our application. Finally, we call the add() method, providing an instance of the JLabel class as the element to add, as well as the GridBagConstraints object to describe to the layout manager how we’d like this control placed in the window.
Adding a Button
Now we can also add a JButton to our window.
// reset the constraints for the button
gbc.gridx = 0;
gbc.gridy = 1;

// create a button
JButton button = new JButton("Close");
// set the button's command:
button.setActionCommand("close");
// send the clicked event to this object
button.addActionListener(this);
// add the button
this.add(button, gbc);
Here, we first reset the constraints to place the button in the 2nd column gridy of our application. We are reusing our GridBagConstraints object here, but in practice it is often better to create a new instance each time. Otherwise we could introduce bugs that are shared across many elements, making it difficult to debug.
Below, we create an instance of JButton to act as our button, and then set two additional options on that button:
setActionCommand()- this allows us to add a custom command to the button, so that when it is clicked we’ll be able to easily determine the source of the event. We’ll see how we can use this below.addActionListener()- by default, when this button is clicked it won’t do anything. So, we need to tell Java which object should be used to listen for clicks from this button. In this case, ourMainWindowclass is implementing theActionListenerinterface, so we use thethiskeyword to direct those events back to this object.
Finally, we use the add() method to add our button to our JFrame. Our GUI is complete, but we still haven’t defined what action to take when the button is clicked.
Action Performed Method
The ActionListener defines one abstract method, actionPerformed(), which we must override in this class. Whenever a user interacts with an element that has listed this object as it’s action listener, the actionPerformed() method will be called. The parameter to this method is an ActionEvent, which we can use to determine which element was used and react appropriately.
@Override
public void actionPerformed(ActionEvent e) {
    if ("close".equals(e.getActionCommand())) {
        // close button was clicked, so exit the application
        System.exit(0);
    }
}
In this example, we simply check to see if the action command associated with that event is the "close" action we added to our button earlier. If so, we use System.exit(0) to terminate our program. Notice that we simply can’t use return here, since the application will continue to run even after this method is called. Instead, we have to shut down the entire application itself, and the simplest way to do this in Java is to use the System.exit() method. We provide a 0 as a parameter to indicate that our program terminated normally. If we provide a non-zero value, it indicates that our program crashed in some way - we can even use different values to represent different error conditions!
Main Method
Finally, we need a main method to actually launch our application.
public static void main(String[] args){
    SwingUtilities.invokeLater(new Runnable() {
        public void run() {
            new MainWindow().setVisible(true);
        }
    });
}
This method is a bit complex, and it does a lot of things in a short amount of time. Basically, we are creating a new thread in Java using the Runnable interface. We haven’t covered threading and parallel programming yet in this course, so don’t worry if you don’t quite understand at this point. A thread is simply like having another application running at the same time, but within our program itself. By doing so, this allows our GUI to run in a different thread than the rest of our application, so they can run side by side. This prevents the GUI from locking up each time our program has to perform a complex task.
You might notice that this code looks somewhat similar to a Java lambda expression. In fact, instead of just creating an anonymous function, here we are creating an entire anonymous class! You can learn more about how to do this in the Anonymous Classes guide from Oracle.
Inside of the run() method of our Runnable object, we simply create a new instance of MainWindow and then set it to be visible.
More information can be found in the Initial Threads document in the Oracle Java Tutorials.