Checkstyle
Finally, we’re at the point that we’ve written our application, a couple of unit tests, verified that the unit tests achieve a high level of code coverage, and we’ve written helpful documentation comments in our code. That’s a lot of content we’ve written, especially in our source code files. Now let’s see how good our coding style is by checking it using a linter.
Checkstyle
There are many different tools that can be used to check the style of source code. One of the most commonly used tools for Java is called Checkstyle. This tool can be easily integrated into Gradle, so it will be the tool we’ll use for now.
Add Checkstyle to Gradle
Just like with JaCoCo, we can use the Gradle Checkstyle Plugin to add Checkstyle to our Gradle configuration. First, we’ll need to open build.gradle and find the plugins section:
plugins {
    // Apply the application plugin to add support for building a CLI application in Java.
    id 'application'
    // JaCoCo plugin for code coverage
    id 'jacoco'
}
We’ll add the checkstyle plugin, so our plugins section should now look like this:
plugins {
    // Apply the application plugin to add support for building a CLI application in Java.
    id 'application'
    // JaCoCo plugin for code coverage
    id 'jacoco'
    // Checkstyle plugin for linting
    id 'checkstyle'
}
Unfortunately, the version of Checkstyle that is included with Gradle is bit out of date. So, we’ll also add some quick configuration information to build.gradle to configure the version of Checkstyle used. To do that, we’ll add this block at the bottom of that file:
// Force Checkstyle to be more current version
checkstyle {
    toolVersion '10.6.0'
}
Checkstyle Configuration
Checkstyle is a very powerful tool, but it requires a configuration file to operate. The configuration file tells Checkstyle what rules to enforce and what rules to ignore. There are a few standard Checkstyle configuration files that are used for Java, but the most common is the one based on the Google Style Guide. So, we’ll need to get a copy of that configuration file and add it to our project.
Here are the steps we’ll follow:
- Download the Google configuration file for Checkstyle version 10.6.0. It can be found at this location on GitHub.
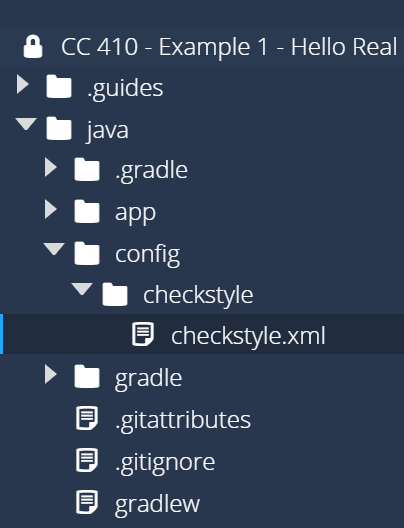
- Create a folder named
configinside of thejavafolder in Codio. - Create a folder named
checkstyleinside of theconfigfolder we just created. - Upload the
google_checks.xmlfile that was downloaded in step 1 to theconfig/checkstylefolder in Codio created in step 3. - Rename that file to
checkstyle.xml.
Once you have done those steps, you should see a directory path similar to this:
Finally, for this course we are going to make one modification to the standard Google-based configuration file for Checkstyle. The Google style guide says that Java code should be indented using only 2 spaces per level. However, most IDEs, including Codio, use 4 spaces by default. Instead of changing the configuration in Codio, let’s change the configuration of Checkstyle to account for that. So, we’ll need to open the checkstyle.xml file we just uploaded to the config/checkstyle directory, and search for the following section of the file (look for line 243):
    <module name="Indentation">
      <property name="basicOffset" value="2"/>
      <property name="braceAdjustment" value="2"/>
      <property name="caseIndent" value="2"/>
      <property name="throwsIndent" value="4"/>
      <property name="lineWrappingIndentation" value="4"/>
      <property name="arrayInitIndent" value="2"/>
    </module>
Once we’ve found that section, we’ll simply double each of the values there. So, all the 2s become 4s and 4s become 8s. When we are done, it should look like this:
    <module name="Indentation">
      <property name="basicOffset" value="4"/>
      <property name="braceAdjustment" value="4"/>
      <property name="caseIndent" value="4"/>
      <property name="throwsIndent" value="8"/>
      <property name="lineWrappingIndentation" value="8"/>
      <property name="arrayInitIndent" value="4"/>
    </module>
There we go! We should now be ready to use Checkstyle in our project.
Running Checkstyle
To run Checkstyle, we can use Gradle once again:
gradle checkThe check task in Gradle will run all checks, including Checkstyle. When we run that command, we should get a bunch of errors like this:
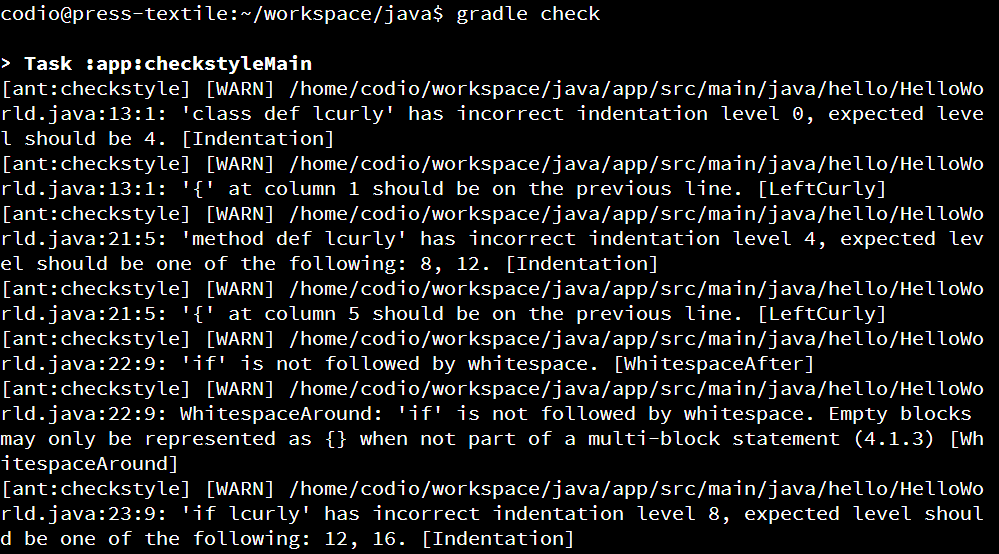
We can also see a friendlier version of this output by going to app/build/reports/checkstyle and opening either main.html or test.html. Remember to right-click and choose Preview Static to open these as webpages. For example, here’s what you might see in main.html:
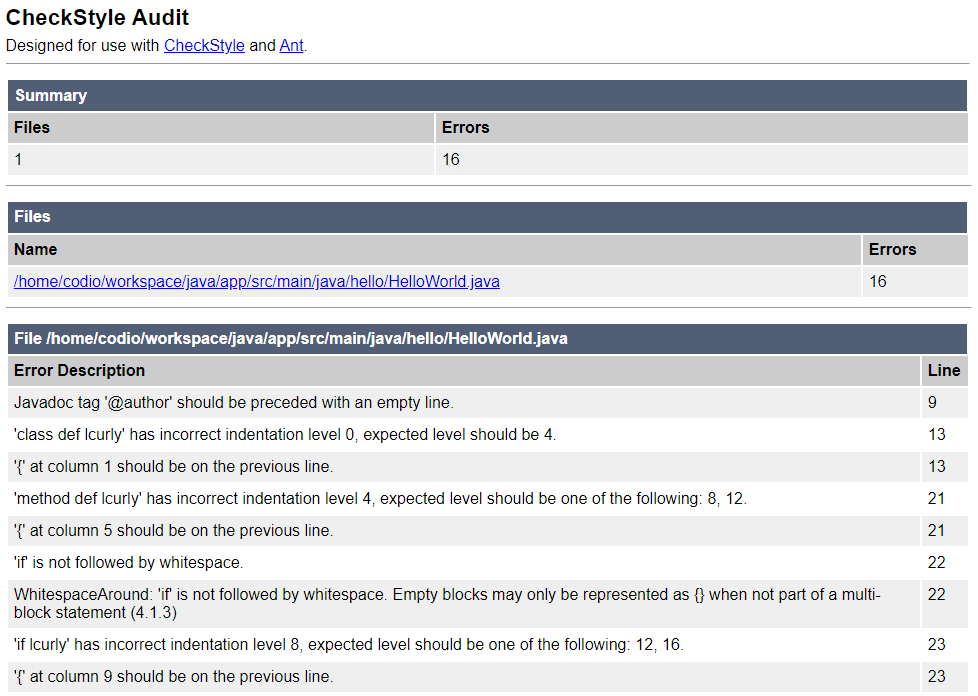
At the bottom of the report is a list of each line of code that contains an error, as well as a description of the error. Let’s look at a couple of these errors and see how we can fix them.
Checkstyle Errors
Javadoc Blank Lines
One of the errors we might receive tells us the following:
Javadoc tag ‘@author’ should be preceded with an empty line.
However, if we look at our code, it might appear that we have an empty line there:
/**
 * The HelloWorld class.
 *
 * <p>This is a sample HelloWorld program to demonstrate proper
 * Java coding style, testing, documentation, and more
 *
 * @author Russell Feldhausen russfeld@ksu.edu
 * @version 0.1
 */
However, use your cursor to look closely at that comment block - it turns out that there is a space after the asterisk on the line before @author, but there isn’t a space after the asterisk in the blank line above. According to the style guide, there should not be anything on a blank line in a comment, not even a space. So, we’ll have to remove it.
This can be really frustrating since Codio helpfully adds those spaces for us, but we really don’t want them. So, in order for our code to pass the Checkstyle tool, we’ll have to remove them. Don’t worry - Python developers have the same problem with Codio constantly adding spaces to blank lines, so it affects everyone!
Curly Brace Location
Another error we received gives us this message:
{’ at column 1 should be on the previous line.
There are a couple other errors on that line, but this is the important one. In our code, we see the following use of curly braces around our class declaration:
public class HelloWorld
{
Did you notice that the curly braces were after the class and method declarations instead of on the same line? Checkstyle did! In section 4.1.2. of the Google Style Guide, they discuss the use of “Kernighan and Ritchie” or “K&R” style of curly braces. This refers to the style of braces used in the famous C Programming Language book by those authors, which has become a common standard across many programming languages. In short, the opening curly brace should be on the same line as the previous statement, but the closing curly brace should be on a new line. The Google style guide includes the following visual example:
if (condition()) {
    try {
        something();
    } catch (ProblemException e) {
        recover();
    }
} else if (otherCondition()) {
    somethingElse();
} else {
    lastThing();
}
So, we can modify our code to use K&R style braces to fix this issue.
Space after Statements
One more error we might receive is this one:
‘if’ is not followed by whitespace.
As discussed above with K&R braces, part of the standard includes adding a space before the opening curly brace after method and class declarations, as well as conditionals and loop statements. So, anywhere we have an if or else statement, we’ll have to remember to include spaces where appropriate.
Passing Checkstyle
Before moving on with this example, modify the code in HelloWorld.java and HelloWorldTest.java to ensure that everything is able to pass the Checkstyle tool. In many professional software development roles, you aren’t even able to save your code unless it passes a style checking tool, so it is a very good habit to get into. In this course, part of your grade will depend on your code following the appropriate style!
Git Commit and Push
This is a good point to stop and commit our code to our Git repository. So, like before, we’ll start by checking the status of our Git repository to see the files we’ve changed:
git statusIn that list, we should see everything we’ve updated listed in red. Next, we’ll add them to our index using this command:
git add .And then we can review our changes using the status command again:
git statusIf we are satisfied that everything looks correctly, we can commit our changes using this command:
git commit -m "Unit Tests and Code Coverage"And finally, we can push those changes to the remote repository on GitHub using this command:
git pushThere we go! We’ve updated our repository once again.